Clone Windows XP to a larger partition with Linux
This article was last edited over 3 years ago. Information here may no longer be accurate. Please proceed with caution, and feel free to contact me.
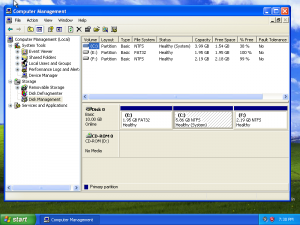
I have XP installed on a drive with a configuration like this. (In reality, each partition was 10x larger, but I’m using smaller numbers for this example).
[ ~2GB FAT32 | E: (/dev/sda1) ]
[ ~6GB NTFS  | C: (/dev/sda2) ]
[ ~2GB NTFS  | F: (/dev/sda3) ]
It may look unusual that C: is not the first
partition, but a setup like this is not entirely unsual for an OEM
hard drive. E: is a recovery/utility partition,
C: is the partition with XP installed, and
F: is an extra partition for backup.
Although this configuration is possible and not uncommon on OEM
drives, when I tried to upgrade this drive to another disk using
linux I ran into some problems. These instructions detail the
process I used to successfully clone the XP (C:)
partition to the first partition on a larger disk using linux.
There instructions cover much of the same ground as a previous post of mine, but with a few key differences.
-
We need a linux live environment with gparted, dd, ntfsprogs, and a few other specialized utilities. You can use these instructions for building such an environment, but you do not have to. Better tested and proven linux live environments like BackTrack, Knoppix, and many others can do the same job.
-
Here is my source installation. XP running on a 10GB disk. Note that XP is not on the first partition.

-
Power off the machine. Connect your larger destination drive and boot to your live linux USB or CD.
-
Use fdisk to identify the drives.
fdisk -lWe can see that
/dev/sdais our source disk and/dev/sdbis our destinationDisk /dev/sda: 10.7 GB, 10737418240 bytes 255 heads, 63 sectors/track, 1305 cylinders, total 20971520 sectors Units = sectors of 1 * 512 = 512 bytes Sector size (logical/physical): 512 bytes / 512 bytes I/O size (minimum/optimal): 512 bytes / 512 bytes Disk identifier: 0x000a0e70 Device Boot Start End Blocks Id System /dev/sda1 2048 4098047 2048000 b W95 FAT32 /dev/sda2 * 4098048 16383999 6142976 7 HPFS/NTFS/exFAT /dev/sda3 16384000 20971519 2293760 7 HPFS/NTFS/exFAT Disk /dev/sdb: 21.5 GB, 21474836480 bytes 255 heads, 63 sectors/track, 2610 cylinders, total 41943040 sectors Units = sectors of 1 * 512 = 512 bytes Sector size (logical/physical): 512 bytes / 512 bytes I/O size (minimum/optimal): 512 bytes / 512 bytes Disk identifier: 0x00000000 Disk /dev/sdb doesn't contain a valid partition table -
For the sake of this article, we do not care about cloning any of the other partitions except the one with XP. As such, we will create only one NTFS partition on
/dev/sdbto act as our destination. I will leave it to you to create this single NTFS partition on/dev/sdb. I prefer gparted myself. After it is created, make sure the partition is flagged as bootable. -
If everything went well, you should now have a single NTFS partition on sdb,
/dev/sdb1We are using
/dev/sda2as the source since that is the partition that has XP. If you have pv installed you can see the progress of the clone using this command./dev/sdb1is our destination.pv -tpreb /dev/sda2 | dd of=/dev/sdb1 bs=4096 conv=notrunc,noerror4.05GB 0:00:55 [98.8MB/s] [====================> ] 65% ETA 0:00:19If you do not have pv installed, this will work.
dd if=/dev/sda2 of=/dev/sdb1 bs=4096 conv=notrunc,noerror -
After the clone is finished, you should use gparted to do a “check and repair” on our new NTFS partition. This ensures that when you boot to XP it can see all of the available space on the drive and is not limited to the space it had on the original partition.
-
Copy a generic MBR to
/dev/sdbdd if=/usr/lib/syslinux/mbr.bin of=/dev/sdb -
Set the first partition as the bootable partition. Note that if you had put XP on a non-first partition, then you could easily update this command as needed.
partclone.ntfsfixboot -w /dev/sdb1 -
Mount the new XP partition on the linux filesystem.
mount /dev/sdb1 /mnt -
Now to modify the boot.ini configuration file for XP
nano /mnt/boot.ini[boot loader] timeout=30 default=multi(0)disk(0)rdisk(0)partition(2)\WINDOWS [operating systems] multi(0)disk(0)rdisk(0)partition(2)\WINDOWS="Microsoft Windows XP Professional" /noexecute=optin /fastdetectNotice that the partition value is set to 2. That is because XP used to be on the second partition. Since that is no longer the case we must update
partition(2)topartition(1)in both the[boot loader]and[operating systems]section. The result should look like this.[boot loader] timeout=30 default=multi(0)disk(0)rdisk(0)partition(1)\WINDOWS [operating systems] multi(0)disk(0)rdisk(0)partition(1)\WINDOWS="Microsoft Windows XP Professional" /noexecute=optin /fastdetectAgain, if you cloned XP to a partition where it was NOT the first partition, you could just as easily change it to
partition(3)or whatever is appropriate. -
Power off the computer, unplug the old drive, and boot into Windows. You should be prompted to run a chkdsk since the filesystem changed. You may also be asked to reboot after the new hard drive is detected by XP. Once done, enjoy your larger hard drive.